Email marketing still ranks high among the best tools for establishing a solid online presence and connecting with your audience in more personal ways. Regular newsletters are the lifeblood of digital marketing — these updates maintain relationships with fans and drive traffic. Email is a classic and effective way to communicate, whether you are releasing new blog posts or conveying exclusive offers.
Streaming your blog posts directly to the inboxes of your subscribers has never been more accessible. Make the most of it — not only reminding your readers about what you published but promoting to them other exclusive offers, resources, or content ground like e-books and loyalty incentives as well. Continue to Stay Top-of-Mind with email marketing, you get the opportunity of being in front over and over again, making it an ever-present means of communications.
Beautiful Emails Made Easy with Pretty Email
Making it (building and sending compelling emails right from your WordPress site) even easier, access to a tool designed for that specific scenario will do the trick. One product is Pretty Email, which we will be launching on 16th September.
In this post, we show how to write an email that removes you from the noise with a Beautiful Email showcasing your latest blog posts and top-of-mind content in case they all missed it. This is an amazing trick to involve more readers on your blog and it will also increase the visibility of posts that you want to make popular, resulting in a lane for crazy remarks from die-hard followers.
Requirements for creating Emails with Pretty Email
Pretty Email can work with any WordPress site and all you need is the Notification or Notification PRO plugin installed and activated to take advantage of various features they offer.
Installing these plugins is incredibly simple. You can download Notification directly from the WordPress plugin directory, while Notification PRO is available for purchase on our website, just like Pretty Email.
Pretty Email is fully compatible with the latest versions of WordPress, and as a brand-new addition to the market, it presents an exciting option for anyone looking to send professional-looking emails in a fresh, innovative way!
How to install and configure the Pretty Email Plugin
Installing and configuring the Pretty Email plugin is a straightforward process. Follow these steps to get it up and running on your WordPress site:
Download and Install the Plugin
First, visit the Pretty Email product page on the official store and purchase the plugin.
After completing the purchase, download the plugin file (in a .zip format).
Log in to your WordPress admin dashboard, and navigate to Plugins > Add New.
Click on the Upload Plugin button, select the Pretty Email .zip file from your computer, and click Install Now.
Once the installation is complete, click Activate to enable the plugin on your site.
Access Pretty Email
After activating the plugin, you’ll find the Pretty Email section under Appearance in the left-hand menu of your WordPress dashboard.
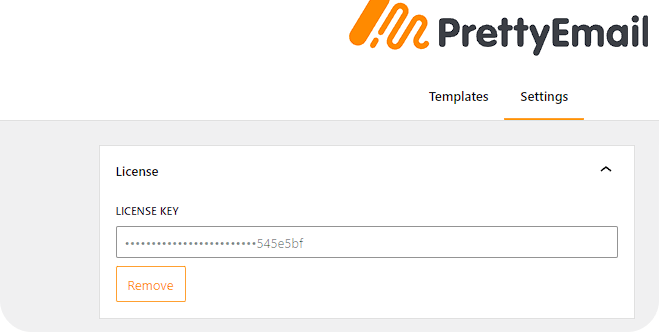
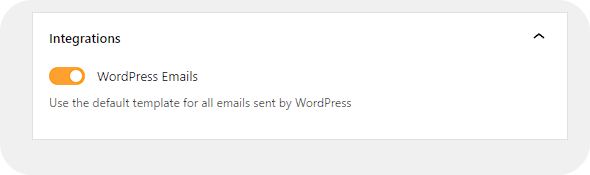
First, enter the plugin license in the Pretty Email settings. The license can be found in the order confirmation and in the customer’s account under Subscriptions.
Second, turn Integration with WordPress emails.
Explore and Customize Email Templates
Inside Pretty Email, you’ll have access to a variety of pre-designed templates that you can browse and use right away.
If you prefer more customization, you can create your own email template using the built-in template builder. This tool allows you to easily drag and drop elements such as text, images, buttons, and blog post summaries to design your email to match your brand.
At this stage, you’re ready to either customize a pre-made template or start building a new one from scratch.
How to design your own template with featured posts: step-by-step guide
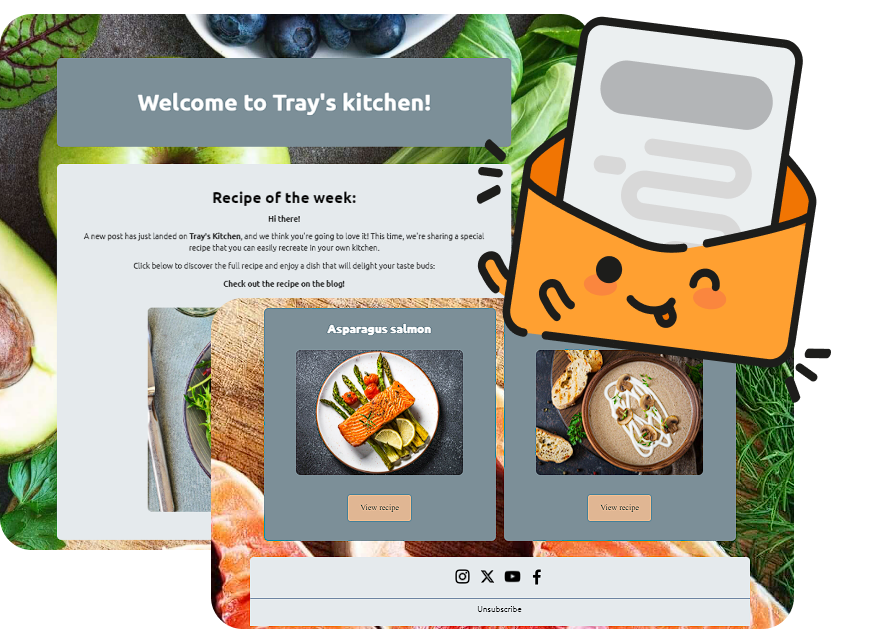
Whether you’re sharing the latest updates from your blog or promoting special features, having a customized email template is key to making a lasting impression. With Pretty Email, you can easily design a professional and visually appealing template that highlights your featured posts, ensuring that your audience stays informed and connected with your brand.
Let’s start making pretty email.
Create a New Template
Start by navigating to the Pretty Email section in your WordPress dashboard.
Click on Create New Template to begin designing your custom layout.
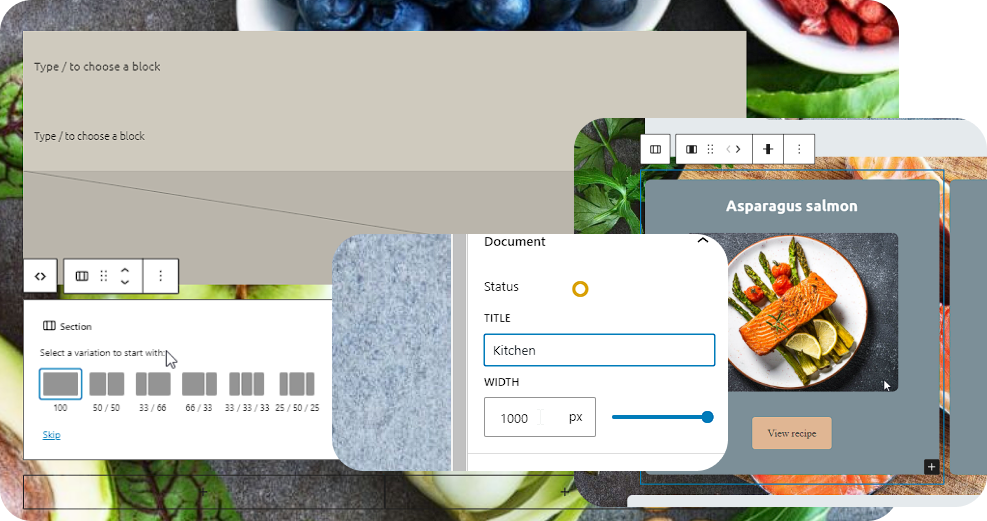
Set view width and main elements
Set the width of your email to ensure it looks great on different devices. Typically, you can choose between full width or a narrower, more focused layout. You’ll find all the tools to make these changes on the right.
Wrappers and sections can be added by dragging and dropping them from the left side, or by adding them with a plus icon. Set the background as a color or photo, making it the best representation of your brand.
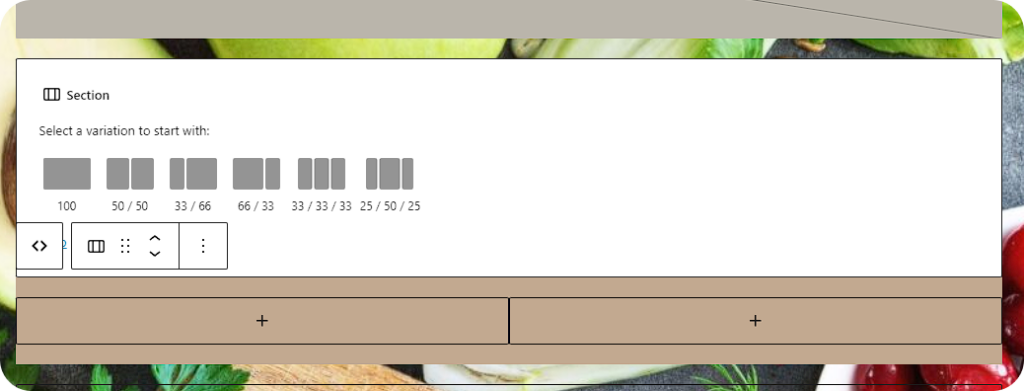
Add all sections, including columns
Structure your email by adding different sections (e.g., header, featured post section, footer). If you want to display multiple posts, create columns for each one.
For example, if you want to showcase two posts, add a two-column section.
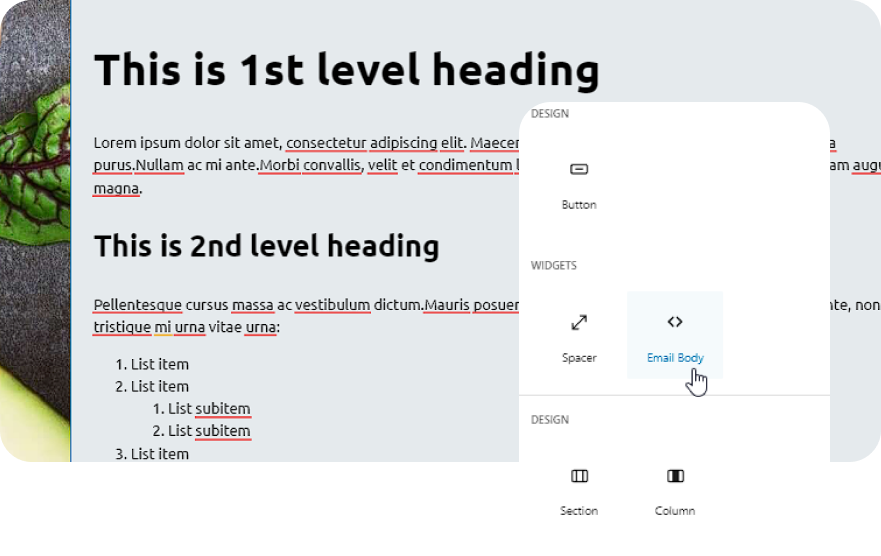
Add Email Body section to add dynamic content
This section allows you to include dynamic content, which you set in the Notification panel.
It can be links, lists that you can dynamically replace using merge tags.
If you want your template to include simple dynamic content, place this section in your email template.
Upload your files
Upload any images or graphics you want to include, such as your logo, banners, or featured images for your posts. You can do this easily from the media library in WordPress. These changes are static.

Enhance each section
Customize each section with text, images, and colors to match your branding. Use the template editor to adjust padding, spacing, and font styles for a polished look.
Add links to sections or buttons
Make your template interactive by adding links to each post. These changes are static.
You can add links directly to text or include buttons like “Read More” or “View recipe” for each post. Ensure the buttons stand out and guide readers to the full content of your blog.
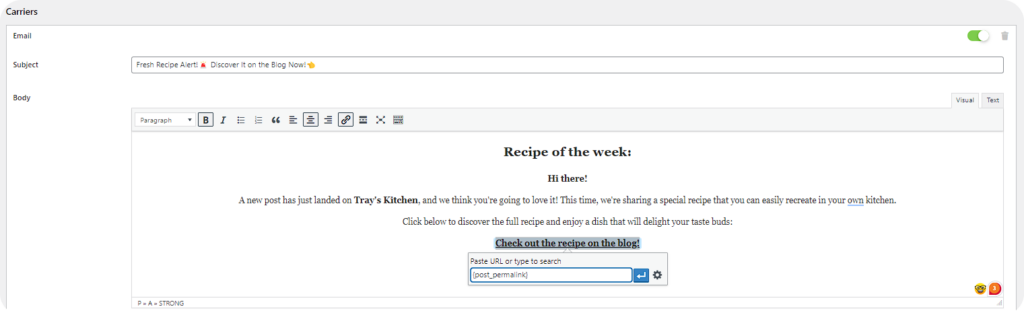
Warning: You can only use dynamic content by utilizing the Email Body (and setting the content in the Notification). To automate a newsletter each time you add a new post, configure the appropriate content with the {post_permalink} merge tag in the Notification.
To enhance the design, consider adding additional links. If you want to change them later, edit the template in Pretty Email.
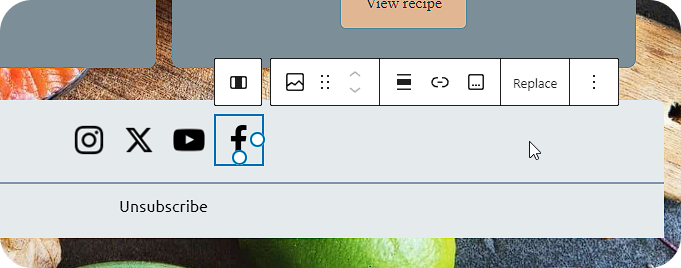
Add links to other channels
Include links to your social media profiles or other platforms where readers can engage with your brand. Add icons for Facebook, Twitter, Instagram, or any other relevant channels in the footer or header of the email. These changes are static
Save and activate your template
Once you’re satisfied with the design, click Save to store your template.
To start using the template for your newsletters, make sure to activate it by selecting it as your default email template or using it in a specific campaign.
How to send a message using a Pretty Email template?
Once you’ve designed the perfect email template with Pretty Email, it’s time to send it out to your audience. Follow these steps to send a message using your template:
Access the Notification dashboard
Navigate to the Notification section in your WordPress dashboard to begin setting up your email campaign.
Create a new notification
Click on Add New Notification to start the process. This allows you to configure the email you want to send.
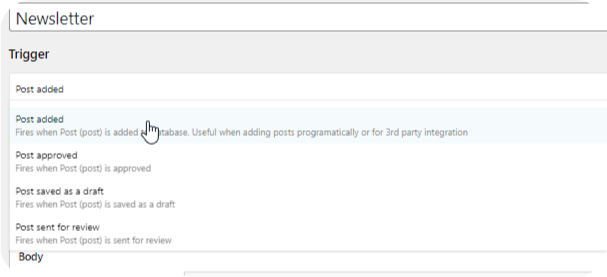
Select the trigger for the notification
Choose what action will trigger the email notification, such as a new blog post, plugin update, or any other event that applies to your site.
Body section – your chance to add dynamic content
Set a compelling subject line for your email, then move on to the body.
Create content that entices your users to read your latest blog post. Be sure to keep the description fairly universal so it pairs well with dynamic content or a link to your most recent post.
You can also include a dynamic excerpt of your post by using the merge tag {post_excerpt} in the description.
Select the recipients
Decide who will receive the email. The recipients must be registered users of your site. In the Role section, select the group or user role (e.g., Subscribers, Customers, or Administrators) that you want to send the email to.
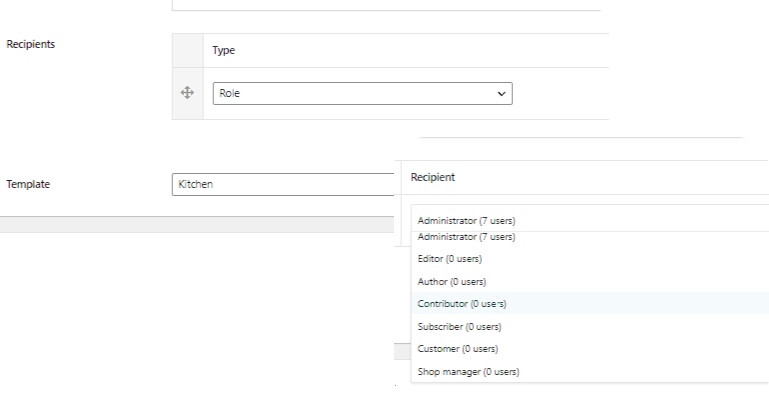
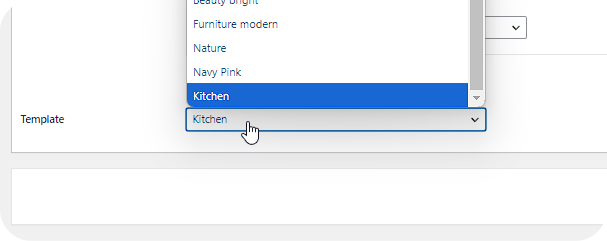
Choose your Pretty Email template
Select the Pretty Email template you previously created from the available options. This will be the design and content framework for your message.
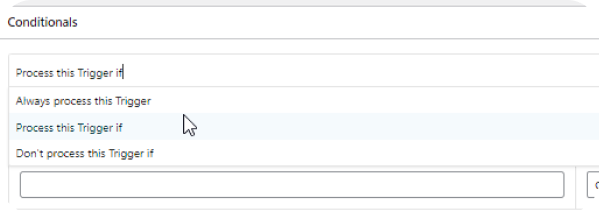
Set conditions (Optional)
If you want to add specific conditions for sending the email, you can do so with the Conditionals extension (available in the Notification Pro plugin or as Notification: Conditionals extension). This allows you to fine-tune who will receive the email based on certain criteria.
Send the Message
Once everything is set, simply click Send to distribute the email to your selected recipients.
Send a test Email (Optional)
If you want to send a test email before the full launch, you can choose the appropriate user role (e.g., Administrators) in the Recipient section and send a test message to ensure everything looks and functions as expected.
Designing beautiful emails and sending them directly from your WordPress site has never been easier.
With Pretty Email, you can effortlessly create eye-catching, professional emails that showcase your latest blog posts and keep your audience engaged—all without leaving WordPress. Whether you’re sending updates, promotions, or simply connecting with your readers, this plugin makes the process intuitive and efficient.
Get started with Pretty Email today, and watch your email marketing efforts reach new heights.