Notification : Conditionals is one of the most frequently downloaded extensions for Notification. If you are a website owner, administrator, or content manager, you likely want to manage notifications effectively and automate processes on your site. Our plugins are designed to complement each other, so by combining Notification : Conditionals with other BracketSpace products, you can create even more scenarios for your site.
Have you ever wondered how you could improve communication with customers in your online store? Or maybe you want to automate notifying your team about new blog posts? Regardless of your needs, below we present some combinations and examples of effectively using Notification : Conditionals with other BracketSpace plugins to help you achieve your goals.
What is the Notification : Conditionals plugin?
Notification : Conditionals is a powerful extension that allows you to add conditions to notifications created using the Notification plugin. With this feature, you can precisely control when and to whom notifications are sent, based on specific criteria.
For example, you can send notifications only when an order exceeds a certain amount, when stock levels fall below a specified threshold, or when a blog post belongs to a specific category. This flexibility allows for more personalized and relevant notifications, which in turn increases user engagement and communication effectiveness.
Notification : Conditionals and WooCommerce
Notification : WooCommerce is an extension that integrates the capabilities of the WooCommerce plugin with the Notification system. WooCommerce is a plugin that allows you to manage an online store on WordPress, enabling the creation, management, and analysis of orders, products, and customers in your online shop.
The integration of Notification : WooCommerce with Conditionals opens up endless possibilities for personalizing notifications in your store.
Sending personalized “Thank You” messages
Goal: Send a personalized “Thank You” email to customers who spend over $500 in a single purchase.
Steps:
1. Create a New Notification:
Go to the Notifications section on the WordPress dashboard and select the option to add a new notification.
2. Select a Trigger:
Choose a trigger related to a WooCommerce order, such as “Order Completed.”
3. Apply Conditional Logic:
Use the “Conditionals” option to add a condition where the order total is greater than $500.
4. Configure the Notification:
Prepare a thank you message, optionally adding a merge tag to include a discount code or personalized content.

Notifying the store manager about low stock levels
Goal: Inform the store manager when the stock level of a product falls below 10 units.
Steps:
1. Create a New Notification:
Go to the Notifications section on the WordPress dashboard and select the option to add a new notification.
2. Select a WooCommerce Trigger:
Choose a trigger related to product updates in WooCommerce, such as “Product updated.”
3. Apply Conditional Logic:
Specify that the notification should be triggered only when the product stock quantity is less than 10 units. Use the trigger {product_stock_quantity} to set this condition.
4. Customize the Notification Message:
Include details such as the product name and the current stock level in the notification message.
For example:
- Subject: “Low Stock Alert: [Product Name]”
- Body: “The stock level for [Product Name] has dropped below 10 units. Current stock: {product_stock_quantity} units.”
By setting up this notification, you ensure that the store manager is promptly informed about low stock levels, allowing for timely restocking and preventing potential stockouts.

Notification : Conditionals and Scheduled Triggers
Scheduled Triggers is a plugin that allows you to schedule notification triggers for specific dates and times. It enables the creation of automated notifications related to events, promotions, or other time-sensitive activities on your site.
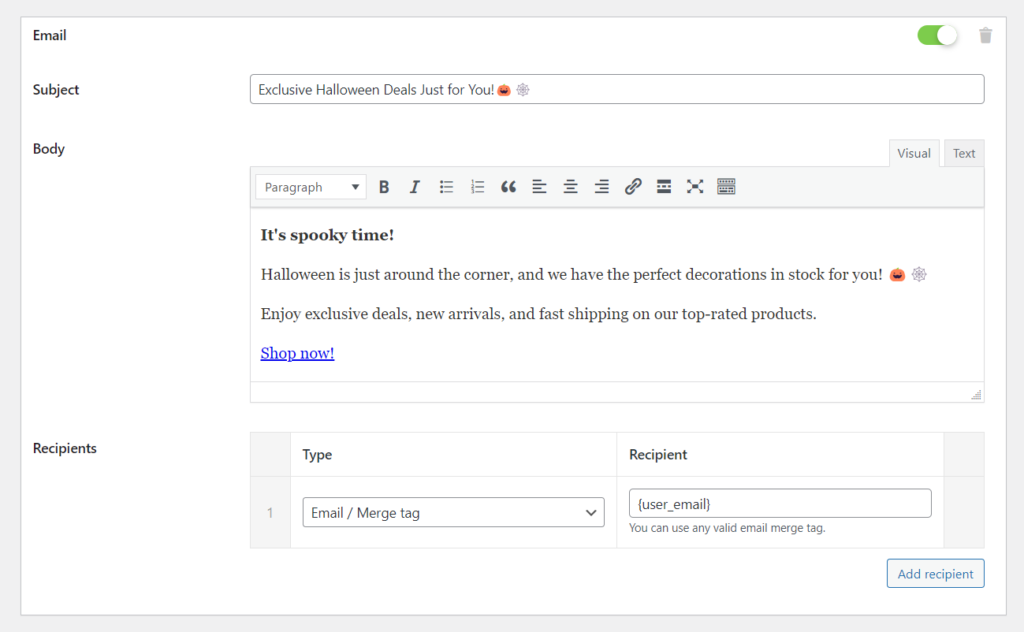
Goal: Automate the process of sending personalized promotional emails to customers for upcoming holidays, but only when products are in stock.
Steps:
1. Scheduled Trigger
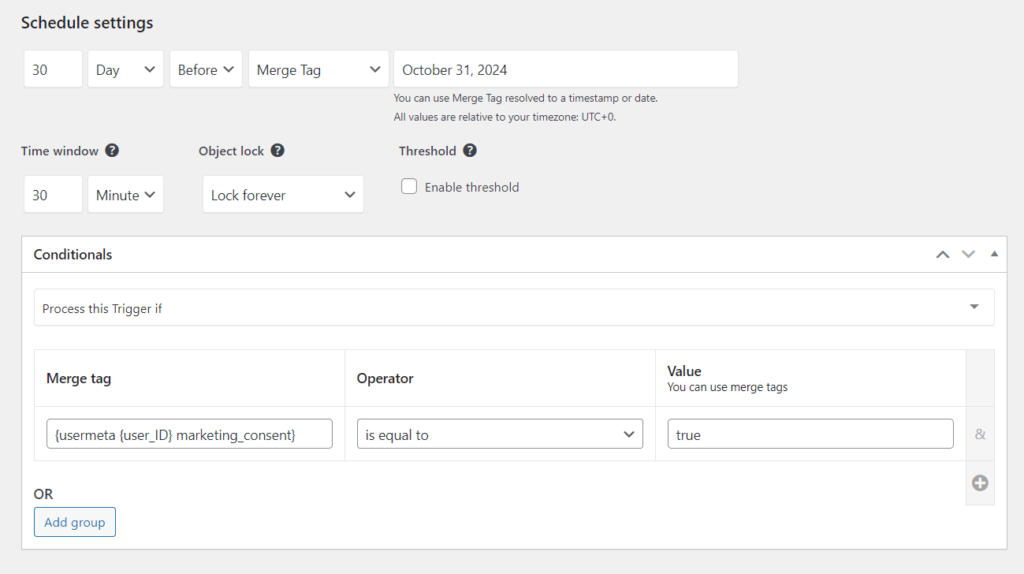
- Configure the trigger to send promotional emails about holiday-related products one month before the holiday for example for a Halloween promotion
2. Conditional Logic
- Use “Conditionals” to check if the products are in stock.
- the condition checks if the user has marketing consent checked in the profile (but first, you need to have the ACF custom field set up with marketing consents)

3. Execution
- When the trigger conditions are met (one month before Halloween and decorations are in stock), the system sends a promotional email to the customer list, ensuring timely and relevant marketing.
Notification : Conditionals and Custom Fields
Custom Fields is a plugin that allows you to add and manage custom fields on your WordPress site. It enables the creation of dynamic notifications based on specific data stored in these fields.
Goal: Automate the process of notifying the appropriate team members when a blog post is published in their area of expertise, using post categories and custom fields. This mechanism ensures that the individuals responsible for content review receive personalized notifications, facilitating quick response and efficient collaboration within the team.
Steps:
1. Install ACF plugin:
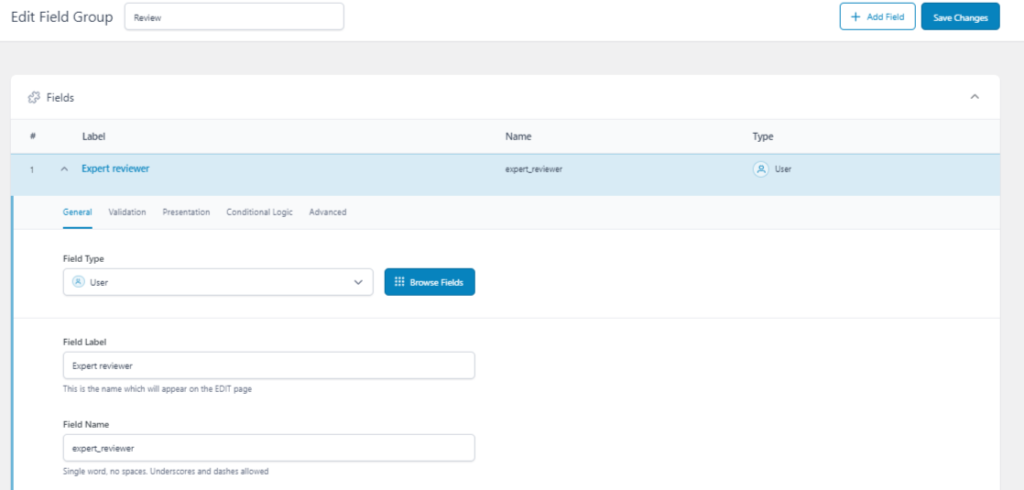
- Add a custom field to the user profile for expertise, allowing the selection of post categories.
2. Conditions for Post Categories:
- After installing the Notification plugin and the Conditionals extension, create a new notification for the “Post Published” event.
- Use Conditionals to specify that this notification should only be triggered for posts in the “Technology” category.
3. Custom Fields in Notifications:
- Assume each post contains a custom field named “Expert Reviewer,” indicating the team member responsible for reviewing content in that category.
- With the Custom Fields extension, you can dynamically include the “Expert Reviewer” value in the notification, personalizing the message to read: “A new post in your area of expertise, Technology, requires your review.”
4. Notification Configuration:
- Set the notification to be sent via email.
- Set the recipient to Merge Tag and use {postmeta {post_ID} expert_reviewer}
- In the email content, use available tags to include the post title, post link, and a custom message mentioning the “Expert Reviewer.”

Try Notification PRO
You can use WooCommerce, Scheduled Triggers and Customer Fields by combining Notification: Conditionals to create personalized, automated workflows that will enhance the functionality as well as user experience on your site.
Notification : PRO All-In Bundle
Loading… / YEAR
Support & Updates
Top-notch support backed by amazing reviews. Future updates of plugin and extensions.
Access to all extensions
Use the power of 16+ extensions, combine them to create personalized automation scenarios.
Access to all future extensions
Every future extension at your disposal, the list is still growing.
With Notification PRO, you have access to all these extensions, eliminating the need to choose between them. This comprehensive access allows you to create even more versatile and powerful configurations. You can combine multiple triggers, conditions, and custom fields to craft a sophisticated notification system that is perfectly tailored to your business needs. This flexibility not only enhances user engagement and satisfaction but also streamlines your workflow, making your site more efficient and effective in achieving its goals.
